VMware Nested Home Lab Part 2 - Management and Workload Domain Design

Welcome again to part 2 of my VMware Nested Home lab series. This part of the series will cover in detail the design for the management and workload domain before we set off to deploy the homelab.
VMware Nested Home Lab Series
- VMware Nested Home Lab Part 1 - Overview
- VMware Nested Home Lab Part 2 - Management and Workload Domain Design
Design Overview
In the previous article, we discussed the use cases of owning a homelab, my choice of hardware and the different designs for a nested homelab. Hereafter we will be using Option 2, where the Lab VMware appliances will be hosted on the Physical ESXi hypervisor server, as shown in the image below.
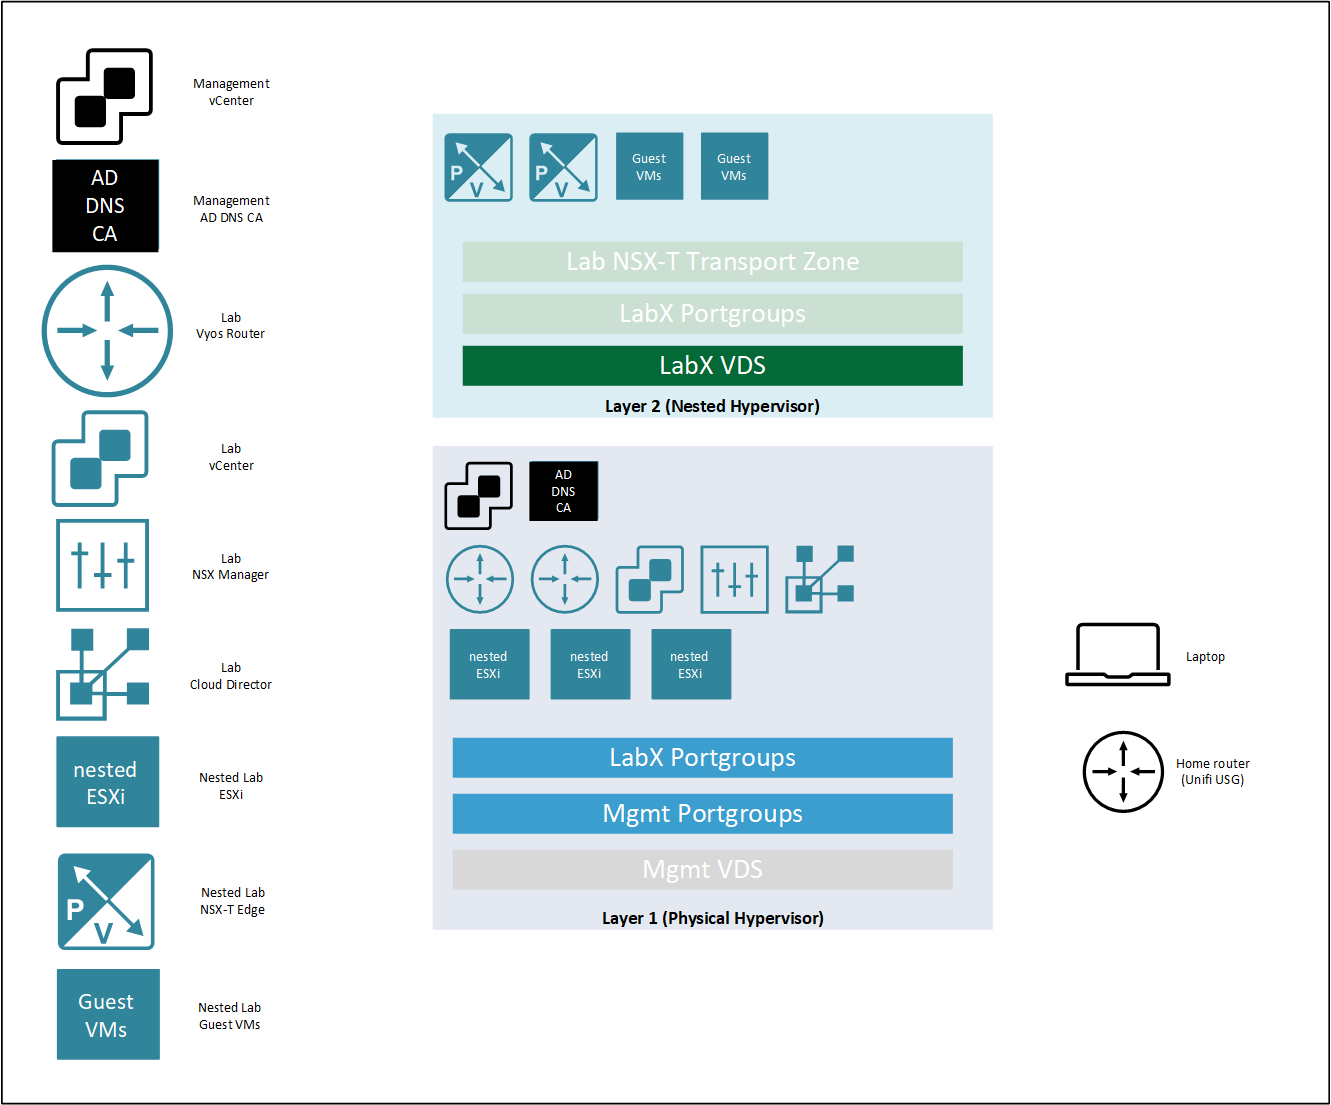
Either Layer 1 or Layer 2 can consist of one or more Hypervisors. For this series, Layer 1 will consist of 1 x Physical ESXi Hypervisor which will form the “Management Domain”, and Layer 2 will consist of at least 3 x Nested ESXi Hypervisors which will form the “Workload Domain” for a single lab.
The following components will be deployed into their respective domain.
| Domain | Component |
|---|---|
| Home | Router Unifi USG |
| Laptop | |
| — | — |
| Management | Management VMware vCenter |
| Management Windows Server (Active Directory / DNS / Certificate Authority) | |
| Labx vyOS router (Top Of Rack1) | |
| Labx vyOS router (Top of Rack2) | |
| Labx Nested VMware ESXi Hypervisor 1 | |
| Labx Nested VMware ESXi Hypervisor 2 | |
| Labx Nested VMware ESXi Hypervisor 3 | |
| Labx VMware vCenter | |
| Labx Vmware NSX-T Manager | |
| Labx VMware Cloud Director | |
| — | — |
| Workload (Labx) | Labx VMware NSX-T Edge 1 |
| Labx VMware NSX-T Edge 2 | |
| Labx Guest VM 1 | |
| Labx Guest VM 2 |
The networking aspect of a nested lab can be a little bit daunting at first, especially when you urgently need to get one spun up asap! The following sections on the Management and Workload Domains will cover this for you.
Management Domain Design
The following image illustrates how the vSphere Distributed Switch (VDS) is configured on the Physical ESXi hypervisor. MP is the abbreviation for Management Platform and Labx could represent Lab1, Lab2, Lab3, etc.
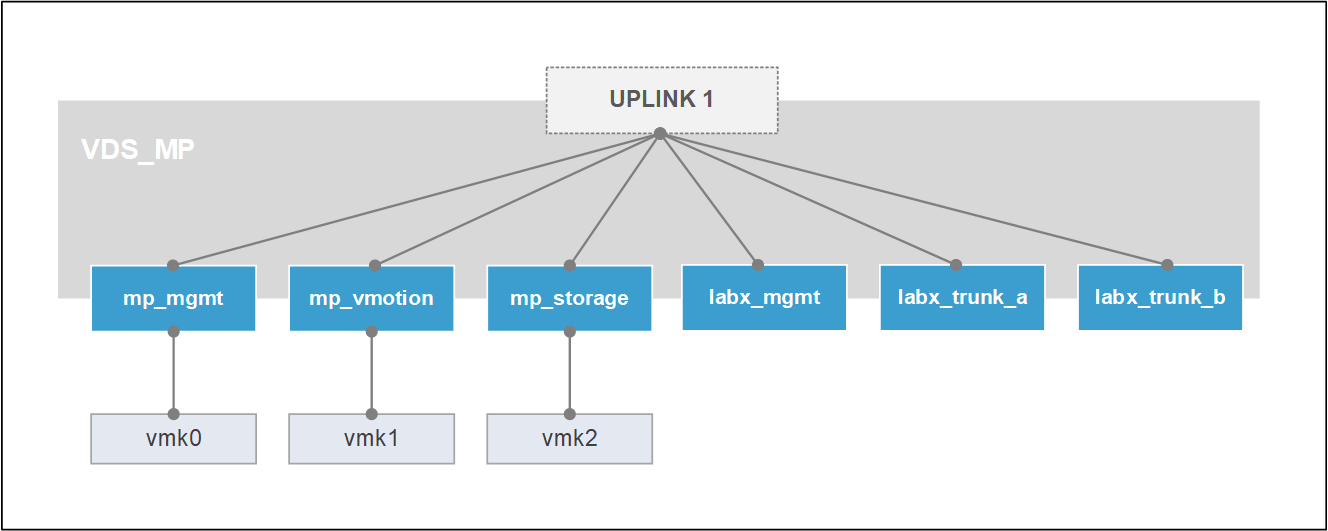
I like to keep my lab networks separated from my home networks, it’s a habit I have picked up and gives me some sense of control. The networks mp_mgmt, mp_vmotion, mp_storage and mp_routers are created on my home router, acting as the default gateway. These VLANs are then trunked to the switch to which the physical ESXi hypervisor is connected.
There is no need for mp_vmotion and mp_storage as a single physical ESXi hypervisor will be used, therefore no vMotion or shared storage. However, I like the option to be available, especially when I have those 3 x Intel NUCs lying around.
mp_mgmt is the management network for the management components within the management domain.
mp_routers is a transit network for the vyOS routers, which enables me to create dynamic routing using BGP between my home router and lab routers. This particular setup is handy, the lab networks can be routable from my home network, therefore I do not require to create a jumpbox, although, the windows server hosting the AD/DNS/CA services could theoretically be one. Furthermore, the home router could act as a core router, peering with multiple labs.
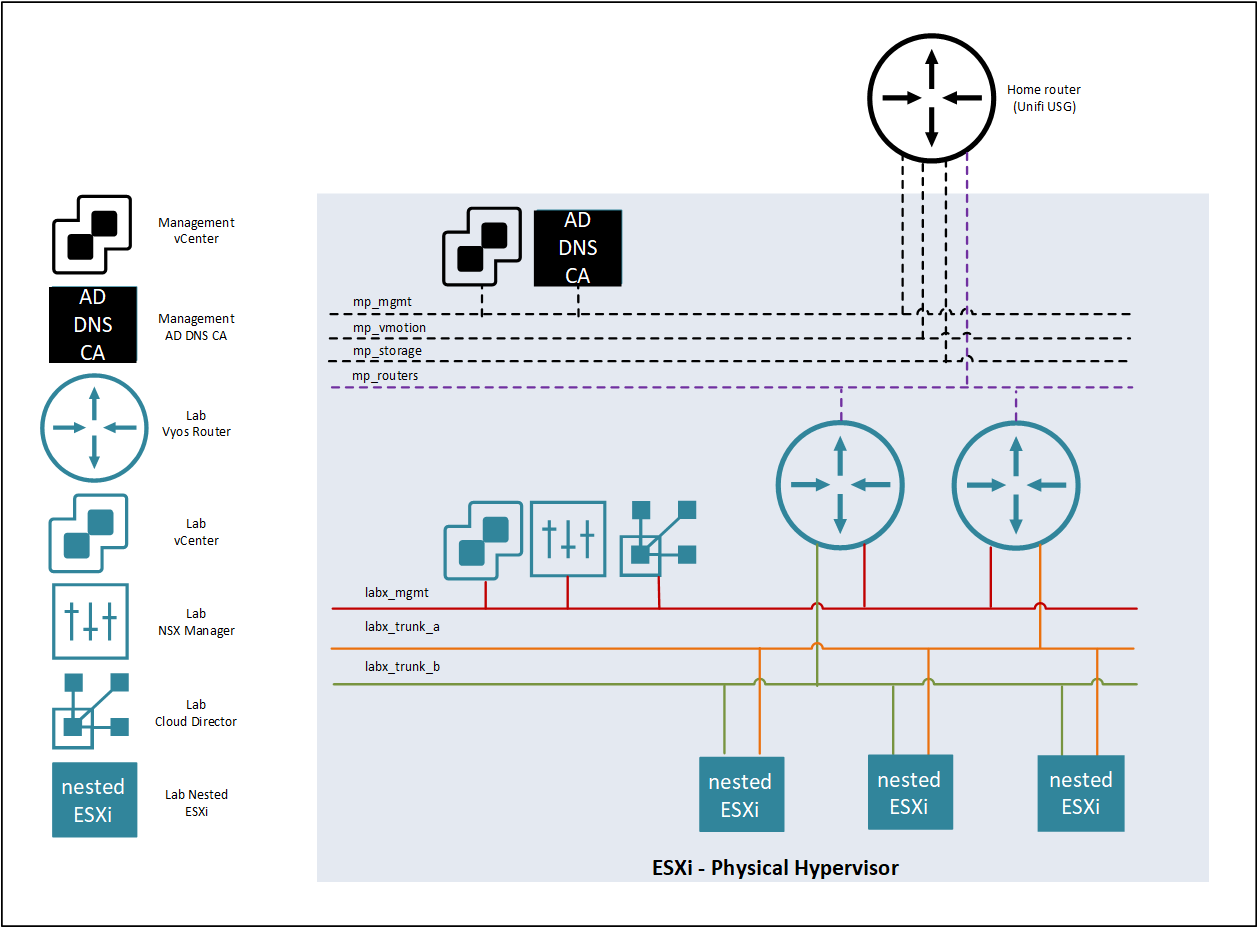
The vyOS routers have three interfaces, which are connected to mp_routers, labx_mgmt and either labx_trunk_a or labx_trunk_b.
labx_mgmt is the management network for the lab components within the management domain.
labx_trunk_a and labx_trunk_b are trunk interfaces created on the lab vyOS routers, with several VLANs that are presented to the nested workload domain. Each nested ESXi hypervisor would have two network adapters connected to both trunked portgroups to simulate a production setup, where each uplink is redundant, connected to a different top-of-rack (TOR) switch.
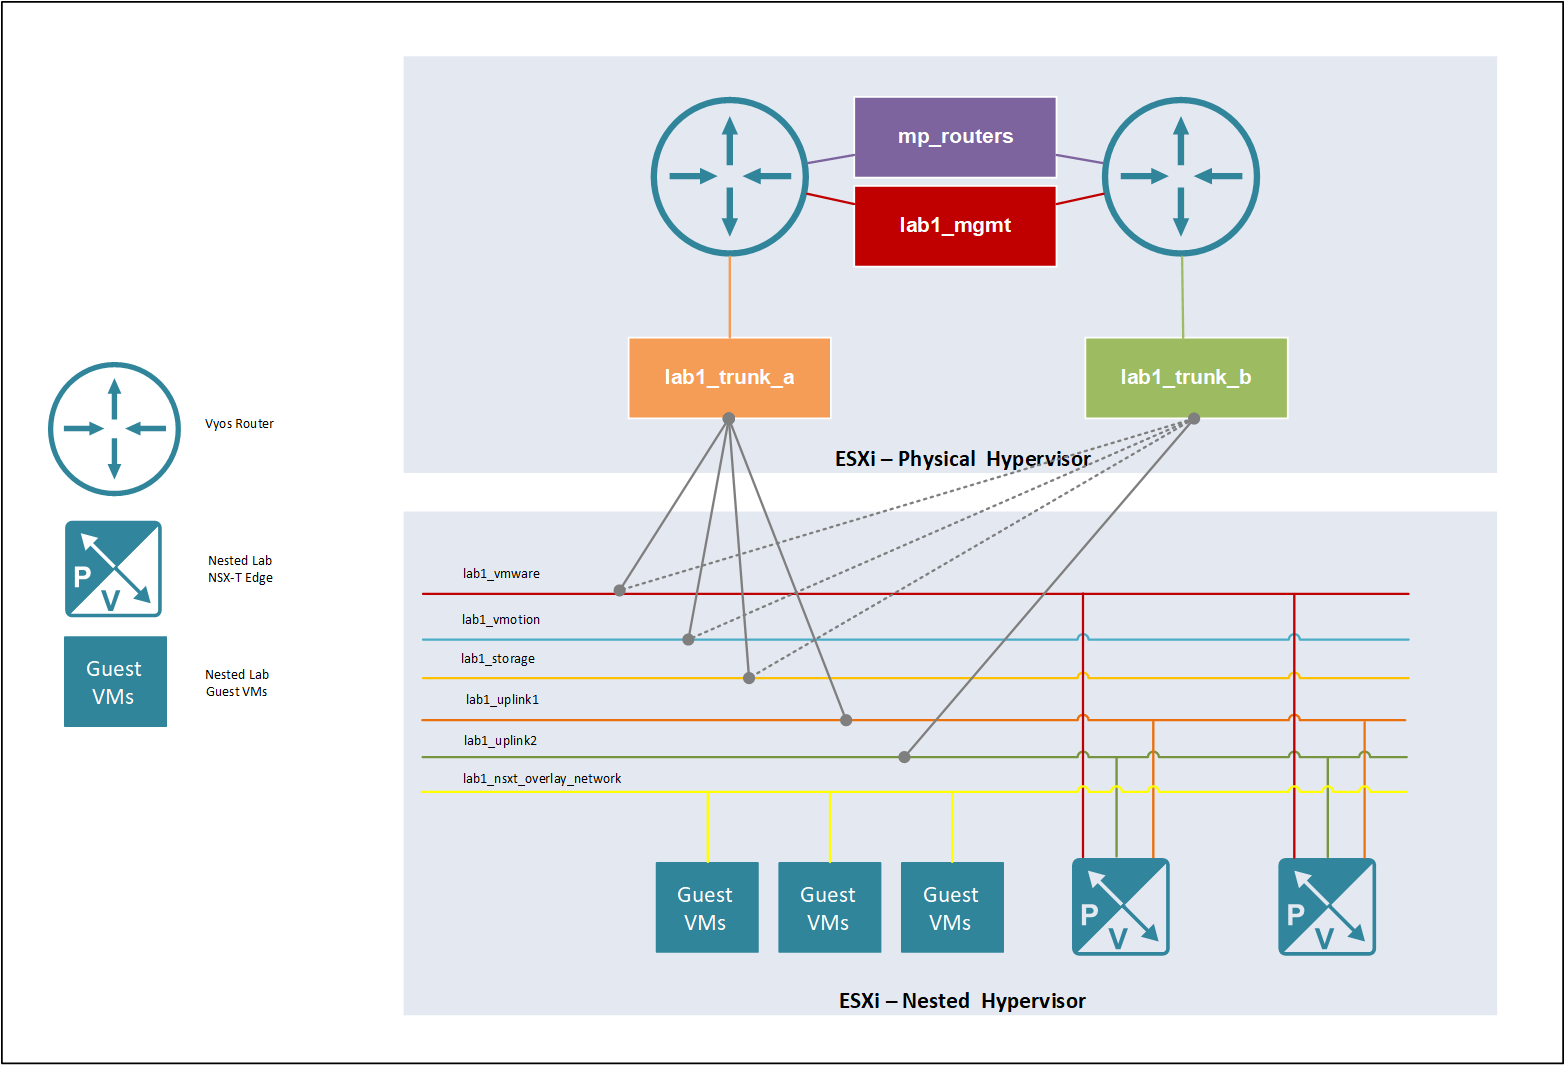
Workload Domain Design
The following image illustrates how the vSphere Distributed Switch (VDS) is configured on the Nested ESXi hypervisor. MP is the abbreviation for Management Platform and Labx could represent Lab1, Lab2, Lab3, etc. The diagram marries up both the VDS on the physical hypervisor with the VDS on the Nested hypervisor. Hopefully, giving a better insight into how the packets transverse via the physical uplink to the nested. As mentioned earlier, each nested ESXi hypervisor would have two network adapters connected to both labx_trunk_a and labx_trunk_b portgroups.
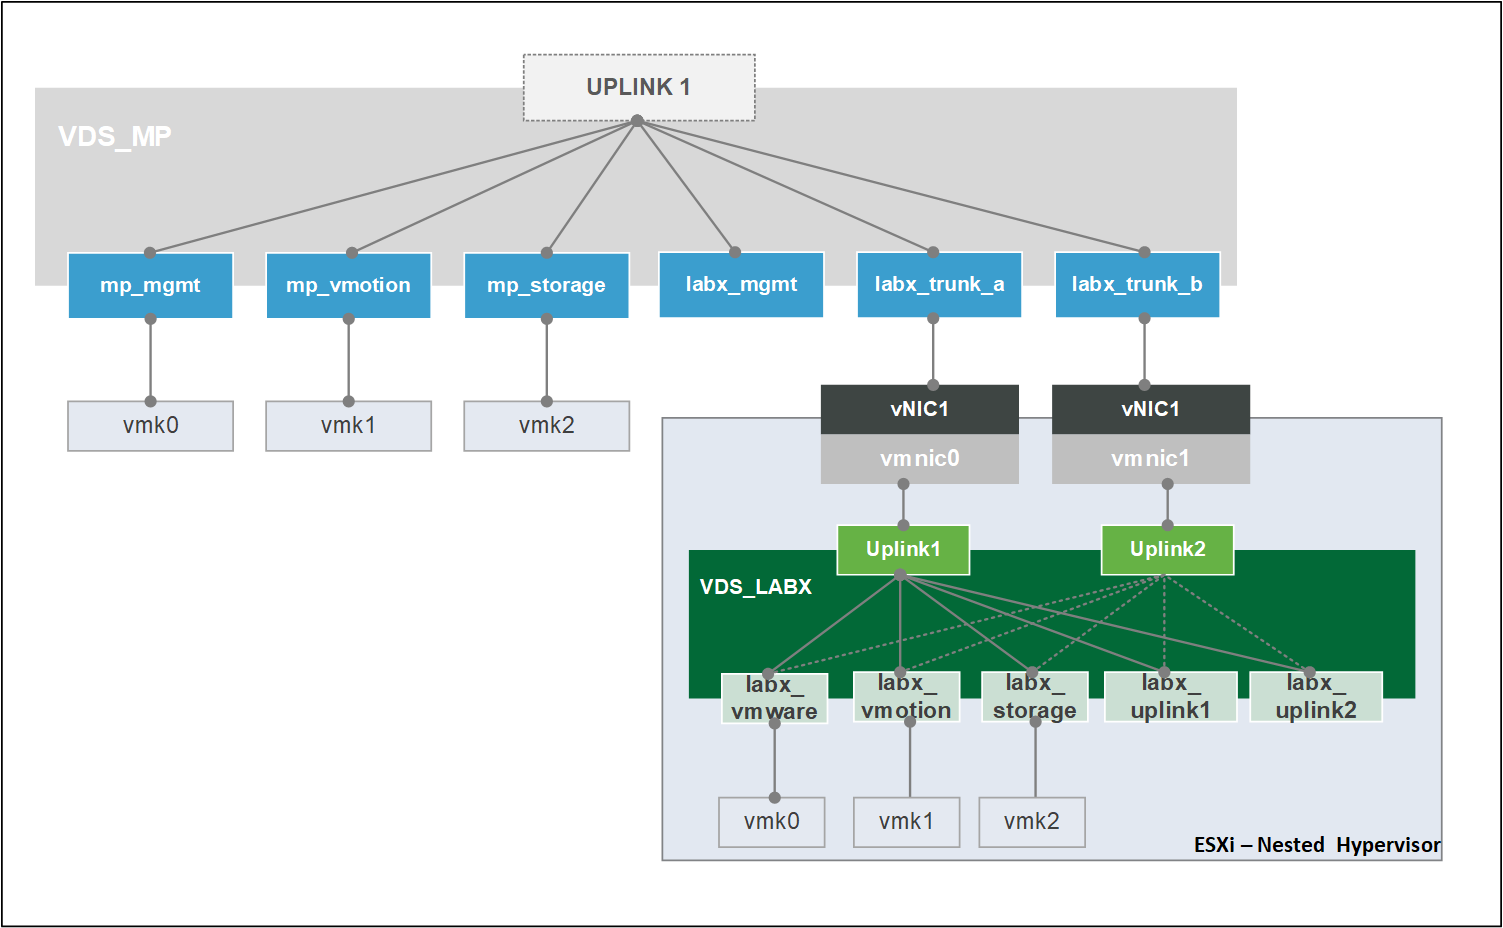
The labx_trunk_a and labx_trunk_b portgroups carry the VLANs required for the workload domain, which are provided by the vyOS routers shown in the below image. Apart from the labx_uplink networks, all networks are present on both vyOS routers in an Active / Standby Failover mode for redundancy using VRRP, illustrated using the solid and dotted lines, where the dotted lines illustrate the links being in standby.
Summary
Hopefully, the above has given a better insight into what a homelab design could look like. Personally, this layout works for me, especially when I cannot afford to have multiple management domains, meaning an increased number of resources. You could say, the Management Domain is shared amongst many different Workload Domains, in our case labs.
The next part of the series will cover the deployment of the homelab, specifically the Management Domain.
