How to create a kickstart bootable VMware ESXi USB drive using Windows Powershell script

To kickstart my technical blog, I thought it would be a good idea to show others how to kickstart the image creation and installation of a physical ESXi server.
Reason
For unexplained reasons, I have found myself tearing down my home lab completely 😅. I have four physical servers in total, therefore, swapping out the monitor and keyboard can be quite tedious, when installing VMware ESXi on each server.
Since it is my home lab, I use a USB drive as the boot media for my servers (not recommended for production). For that reason, I need to ensure that the ESXi installation kickstart config file will install VMware ESXi onto the same USB drive which contains the ESXi bootable image.
Tested release versions
| Software | Version |
|---|---|
| ESXi | 7.x / 8.x |
| PowerShell | 5.1.x |
Prerequisites
| Item | Notes |
|---|---|
| Windows Machine | The host on which the script will run and USB attached |
| PowerShell (Administrator) | Administrator priviliges required for script to be run |
| VMware ESXi Hypervisor iso | Can be downloaded from VMware |
| Script downloaded from GitHub (Link) | Script created by Harry Thambi to create a bootable ESXi USB drive to kickstart installation automatically |
| ESXi configuration | Basic configuration for the ESXi server - IP, Netmask, Gateway, Nameserver(DNS), VLAN(optional param), Hostname, Root password |
| USB Flash Drive | On wich the ESXi bootable Image and Kickstart will be written onto. The Drive will also be used as the boot disk for the ESXi OS |
How-to
Download the CreateBootableESXiUSB.ps1 PowerShell script from the GitHub Repo. You can either
use git clone (if you have Git installed on your Windows Machine)
git clone https://github.com/harrythambi/esxi-bootable-usb-kickstart.git,
or use PowerShell to download the file to a chosen file path, in the following example, the file will be saved in the Desktop directory. Invoke-WebRequest -Uri "https://raw.githubusercontent.com/harrythambi/esxi-bootable-usb-kickstart/main/CreateBootableESXiUSB.ps1" -OutFile "~\Desktop\CreateBootableESXiUSB.ps1"
Download the ESXi ISO image from VMware, in the following example, the file will be saved in the Downloads directory.
| Version | Link |
|---|---|
| VMware vSphere Hypervisor (ESXi) 8.0.0 | (Download) / (Release Notes) |
| VMware vSphere Hypervisor (ESXi) 7.0U3g | (Download) / (Release Notes) |
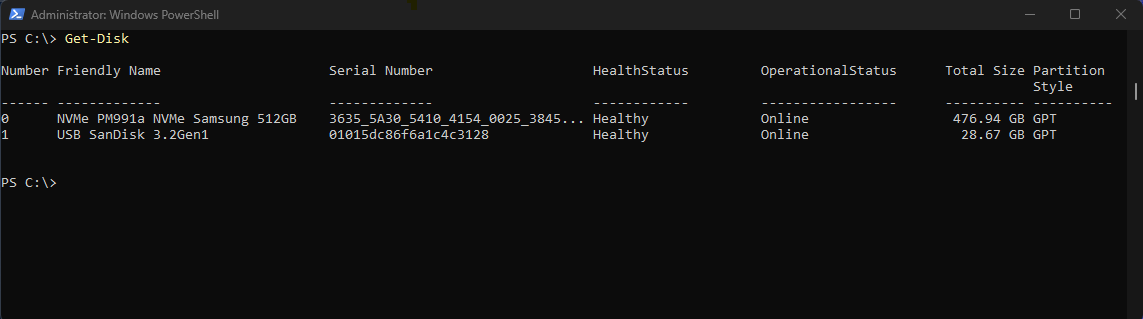
Identify the USB flash drive disk number. Get-Disk Make sure to select the correct one, or you will end up erasing the contents of another drive.
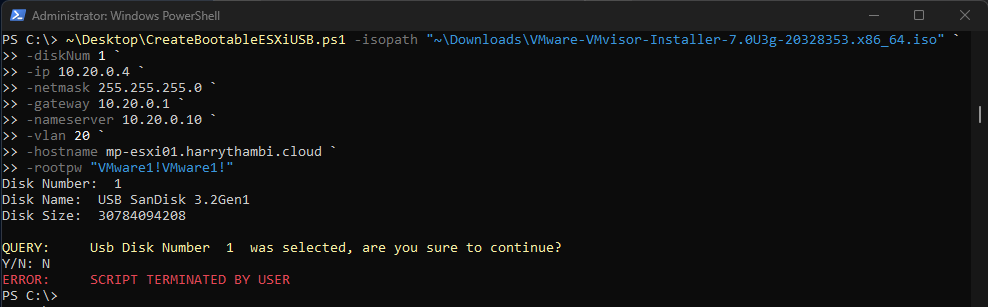
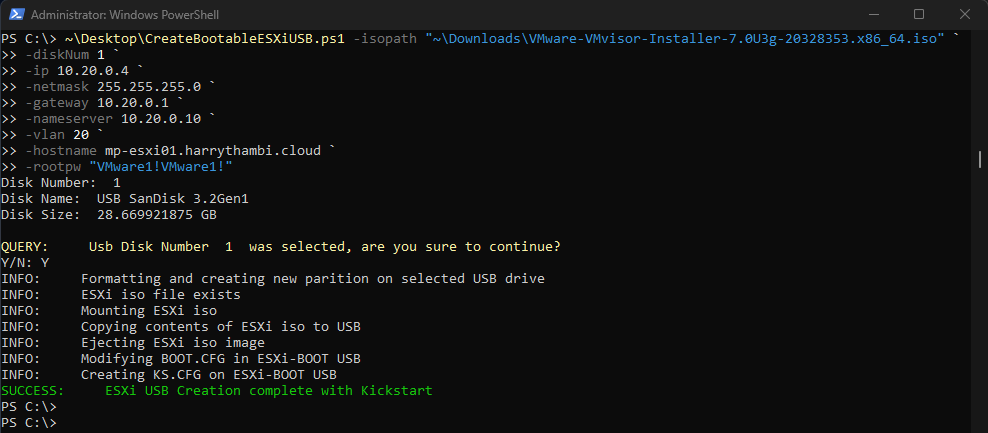
Using a PowerShell terminal with Administrator Privileges, run the script specifying the USB drive disk number and the ESXi networking configuration, use the following example as a template:
|
|
You will then be prompted whether the correct disk has been selected, Y to continue, or N to terminate the script and try again.
The USB can now be ejected safely from your Windows device and plugged into the powered-off server.
Done
Once the USB device is inserted into the Server, power on the device, grab a coffee, and if you like, monitor the progress with a monitor. It should take approximately 10 minutes for the installation to complete. If you are lazy like me, keep a constant ping to your new ESXi host and wait for a response to know it is ready to be consumed.
